Installation
Online Training Manual for LG Products - Installation
WEIGHT HAZARD
A refrigerator can weigh as much as 359 pounds (163 kg). Use a minimum of two people for moving and servicing this refrigerator. Use some form of floor protection when moving a refrigerator.
LEVELING
 |
Be sure the floor is level and strong enough to support the refrigerator. Unstable installation or unleveled flooring may cause vibration, noise, and poor door operation. Be sure to level the refrigerator at installation using the height adjusting screws (leveling legs.)
If the base grille (kick plate) is installed, remove it by removing the two screws that hold it on.
When the refrigerator is in place, adjust
the leveling legs by turning them counterclockwise to raise or clockwise to lower the refrigerator.
|
 |
Use an 11/32 (8 mm) wrench to turn the hex ends of the leveling bolts or stick a flat screwdriver in the slots to turn them. If you have a helper to push against the top of the refrigerator and take the weight off the leveling legs, you can turn them by hand.
Be sure to lower them enough to contact the floor and support some of the weight of the refrigerator. It will keep it from moving when you pull the doors open and from tipping forward when the freezer drawer is pulled out.
Replace the base grille.
|
WATER LINE CONNECTION
Read ALL the directions thoroughly before you begin. Be certain you understand all the requirements for installing and connecting a water connection for this refrigerator.
WARNING!
Connect the water supply tube from the refrigerator to a potable water supply only.
The water pressure requirement for this refrigerator is 43 ~ 121 psi (3 ~ 8.5 kgf/cm2). If the existing pressure is insufficient, the customer can purchase a separate pressure pump to provide normal icemaking and water dispensing operation.
The total length of the water supply line should not be greater than 26 feet (8 meters.)
Use copper tubing or a braided, reinforced nylon supply line.
Install the water line in an area where the temperature will not drop below freezing.
It may take up to 24 hours for the icemaker to begin producing ice.
The icemaker water valve includes a flow washer that functions as a water pressure regulator.
TOOLS REQUIRED
Standard screwdriver
1/4 nut driver
7/16 open-end wrench
17/2 open end wrench
1/4 drill bit
drill (electric drills must be grounded)
WATER LINE INSTALLATION KIT
 |
Some dealers sell an installation kit that includes all the parts necessary to connect the refrigerator to a water line. Often, these kits include a piercing saddle-type valve that allows connection to the water line without the need for plumbing skills. We do not recommend the use of this type valve because it often fails to provide sufficient water flow for the icemaker and dispenser to function properly.
Various connector types are available. These illustrations show a saddle valve
with the water line connected using a compression fitting at each end.
|
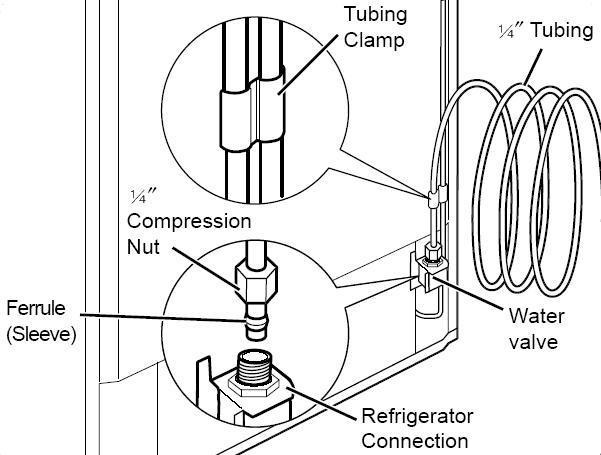 |
Some dealers sell an installation kit that includes all the parts necessary to connect the refrigerator to a water line. Often, these kits include a piercing saddle-type valve that allows connection to the water line without the need for plumbing skills. We do not recommend the use of this type valve because it often fails to provide sufficient water flow for the icemaker and dispenser to function properly.
Various connector types are available. These illustrations show a saddle valve
with the water line connected using a compression fitting at each end.
We do not recommend the use of this type valve because it often fails to provide sufficient water flow for the icemaker and dispenser to function properly.
The additional coil of tubing (approximately 7 feet or 2.1 m) is to allow pulling the refrigerator out for servicing or cleaning.
We recommend the use of a pre-assembled braided plastic or nylon line with threaded couplings on both ends to prevent leakage and pop offs.
|
CONNECTING THE WATER LINE
The best solution is to use a braided reinforced nylon supply line with screw-on fittings on both ends. These allow the simplest and easiest connection with fewer leaks and problems. If you dont use this type connection, we recommend using a flare nut wrench to connect the water line fittings. After the valve has been installed, the water line must be flushed before connecting it to the refrigerator. Remove the plastic cap from the water valve on the back of the refrigerator. Attach the water supply line to the valve. Open the valve and flush out the supply line before attaching it to the refrigerator. Attach the supply line to the water valve on the back of the refrigerator. Tighten all connections. Turn on the water and check for leaks. Press the water dispenser button and bleed all the air through the system. When water begins coming out, run another quart to be sure all the air is out of the line. Turn the icemaker on and cycle it manually until water fills the tray to ensure all the air is out of the line.
FLOORING REQUIREMENTS
The refrigerator must be installed on a solidly constructed floor to minimize noise and vibration. The refrigerator must be level. If necessary, adjust the leveling legs under the front of the refrigerator to compensate for variations in the flooring. This is easier if the refrigerator is tipped slightly backward to take the weight off the legs. Turn them clockwise to raise the refrigerator or counterclockwise to lower it.
Never install the refrigerator on a platform or a weakly supported structure.
When moving the refrigerator for cleaning or service, be sure to protect the floor. Pull the refrigerator straight out. Do not walk or wiggle it; floor damage or side panel damage may occur.
HANDLE REMOVAL
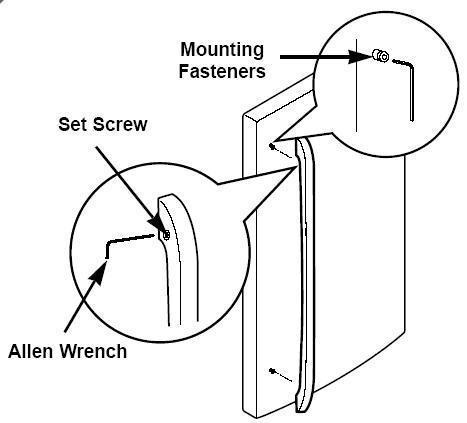 |
It may be necessary to remove the handles to get the refrigerator through a door.
Loosen the set screws with a 3/32 (2.5 mm) Allen wrench.
Remove the handle.
If the mounting bolts require removal or adjustment, use a Ό Allen wrench.
|
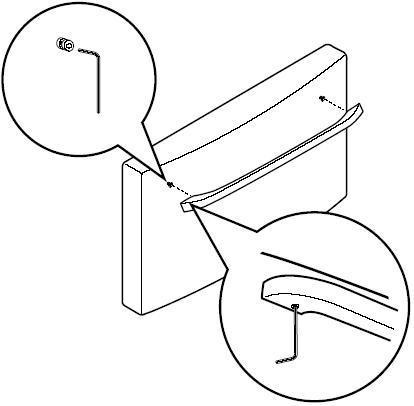 |
Use extreme caution when removing the handles to avoid scratching the doors. When you remove or replace a handle, push (or pull) firmly but do not damage the handle or the door by using excessive force.
Replace the handles by placing the handles on the mounting bolts and tightening the set screws.
|
WATER TUBE CONNECTION
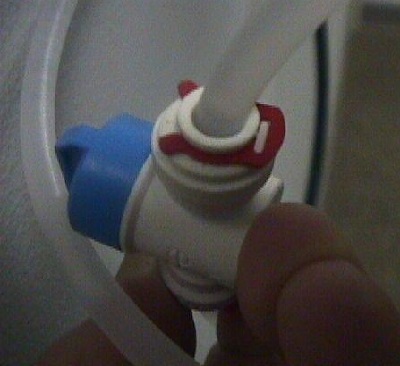
|
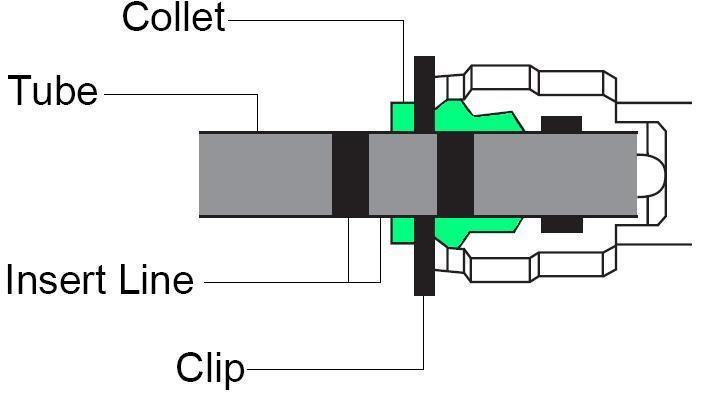
The water tube connections must be properly assembled to avoid leaking.
|
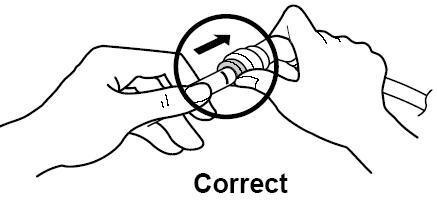
|
Insert the tube into the connector until only one of the printed lines is visible.
Pull on the tube slightly to ensure proper insertion and retention. Insert the retainer clip under the release ring. If the retainer clip is not in place, the connector can be released, flooding the house.
|
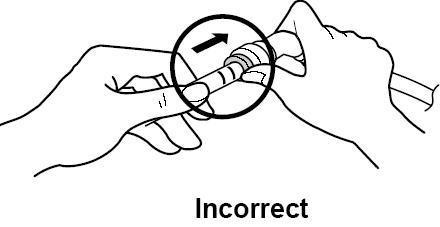
|
If you can see both rings, the tube is not inserted properly. The tube end must be cut squarely. If someone has already trimmed the end, the marks may be misaligned. Check for leaks to be sure.
|
DOOR REMOVAL
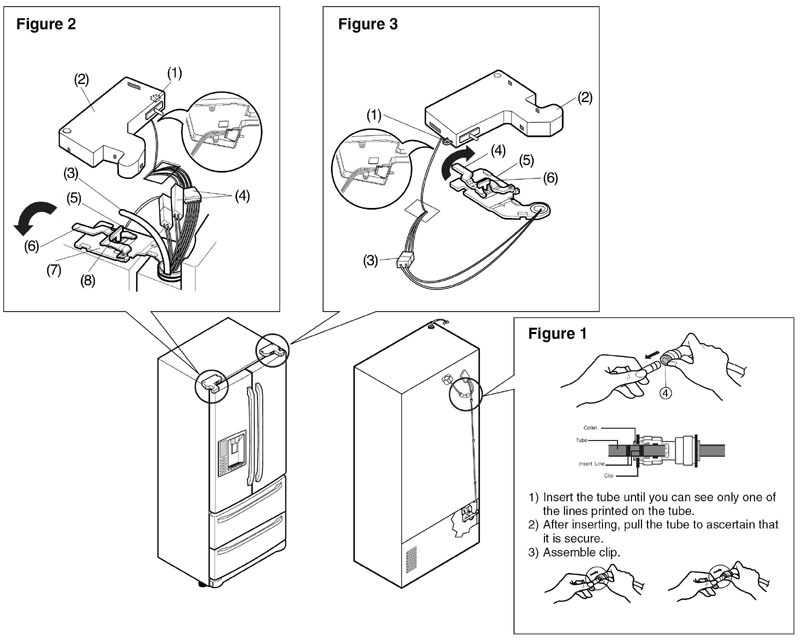
|
If the refrigerator is in use, be sure to remove all food and door bins. Unplug the refrigerator and turn off the water. When the doors are removed, place them on blankets or padded surfaces to prevent damage.
Do not put your hands, feet, fingers, or metal (conductive) items into the air vents, the base grille (kick plate), or bottom of the refrigerator. You could be injured or shocked.
If the entrance door is too small to accommodate the refrigerator, you can remove the doors and pull the refrigerator into the room sideways.
|
Follow these steps to remove and replace the refrigerator doors. Refer to the drawings.
RIGHT DOOR
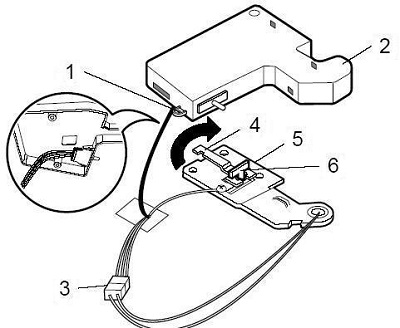 |
Open the door to 90°.
Remove the top hinge cover (1) screw.
Lift the cover (2).
Disconnect the wire (3) harness.
Rotate the hinge lever (4) clockwise and remove it.
Lift the top hinge (5) clear of the hinge lever latch (6).
|
LEFT DOOR
 |
Disconnect the hose at the top right corner (facing the back) by removing the release clip and pressing the release ring. The tube will be pulled out with the door when it is removed.
Open the door to 90°.
The door must be opened to 90° to be removed or reattached.
|
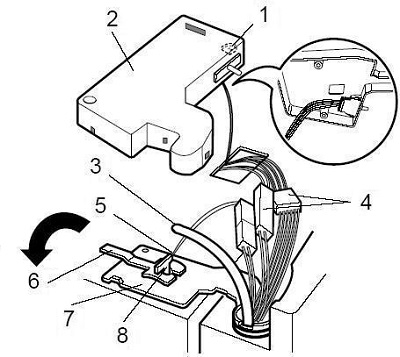 |
Remove the screw (1) securing the top hinge cover.
Use a flat screwdriver to pry off (2) the hinge cover. (Hooks not shown.)
Remove the cover and pull the (3) water tube through.
Disconnect all the wiring (4) harnesses.
Remove the ground (5) screws.
Turn the hinge lever (6) counter-clockwise and remove it.
Lift the top hinge (7) free of the latch lever (8).
Be careful the door does not fall forward. With the door open to 90°, lift it off the middle hinge pin.
|
Questions? Comments! Concerns? Report an error?
Let us know!
An e-mail should solve the problem.


