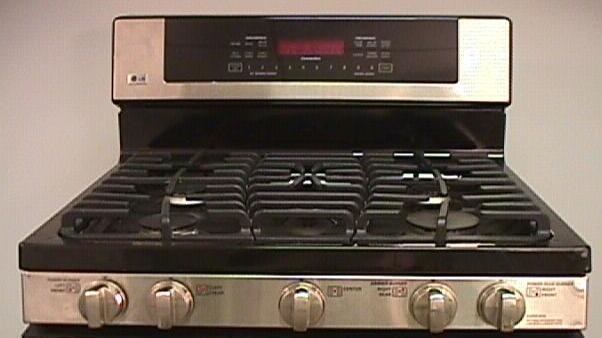
We include brief operating instructions for the technician to allow a thorough check-out of the appliance and to use during diagnosis and repair.
There are five surface elements, each of which is a different output. The controls are all the same, though. Press the knob that corresponds to the element you wish to operate and turn it counterclockwise (to the left) to the light position. You will hear the tik-tik-tik of the igniter as it sparks to ignite the gas.
When the burner is lit, turn the knob to the desired setting. Turn it clockwise to the OFF position to extinguish the flame. When one burner control is in the IGNITE position, the igniters on all the surface elements will fire. The surface burners are controlled by manual valves. These valves have a low flame or simmer adjustment, which will be covered later in this manual.

The oven is vented through ducts at the rear of the range top. Do not block these vents while cooking in the oven. Because of the heat, do not leave closed containers on the cooktop due to the burst hazard. Do not leave plastic or flammable items on the cooktop; they may melt of ignite. Pot handles and utensils will become very hot is left on the cooktop near the vent and could cause burns.
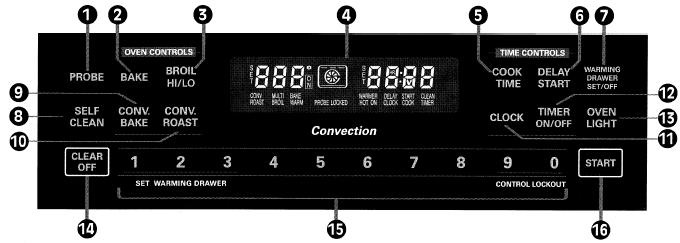
The gas oven, electric warming drawer, convection, and self-cleaning functions are operated from the electronic touchpad control on the back of the range.


This oven is not designed for open-door cooking. To operate the oven for regular (non-convection) baking or roasting:
1. Touch BAKE
2. Touch the number pads to enter the desired temperature.
3. Touch START. The display will show ON and 100° (or 40° if set for Celsius.) As the oven heats, the display will show the changing temperature. When the set point is reached, the buzzer will sound.
4. Touch CLEAR/OFF when cooking is complete.

This oven is not designed for open-door cooking. To operate the oven for regular broiling:
1. Place the meat or fish on the broiler grid in the broiler pan.
2. Follow the suggestions for shelf positions in the Broiling Guide (See owner’s manual, page 15.)
3. The oven door must be closed during broiling.
4. Touch BROIL HI/LO once for high or twice for low.
5. Touch START.
6. Touch CLEAR/OFF when broiling is complete.

The oven fan is turned off when the oven door is opened. Do not leave the door open for long periods of time while using convection cooking. Since the oven is not designed for any sort of open-door cooking, we recommend leaving the door shut all the time other than when placing items in the oven or removing them.
1. Touch CONV BAKE or CONV ROAST.
2. Touch the number pads to set the desired temperature.
3. Touch START. The display will show ON and 100° (or 40° if set for Celsius.) As the oven heats, the display will show the changing temperature. When the set point is reached, the buzzer will sound.
4. To change the oven temperature, touch CONV BAKE or CONV ROAST and then touch the number pads to set the new desired temperature.
5. Touch CLEAR/OFF when broiling is complete.
When using the convection oven, it will automatically convert the temperatures from regular baking to convection baking. No user intervention is necessary.

1. Touch CLOCK.
2. Touch the number pads to enter the time. You must touch them in the order they are read; for example, to enter a time of 10:54, you must touch 1, 0, 5, and 4.
3. Touch and hold START until the time shows in the display.
4. To check the time while something else is showing on the display, simply touch CLOCK.

The probe allows a reading of the internal temperature of the food during cooking. Insert the probe into the food (typically a large roast or portion of meat) and plug it in to the socket in the oven.
1. Insert the probe into the food.
2. Plug the probe into the socket inside the oven.
3. Touch PROBE.
4. Touch the number pads to set the desired internal temperature of the food between 100° F (38° C) and 200° F (93° C).
5. Touch BAKE.
6. Touch the number pads to set the desired oven temperature.
7. Touch START.
8. When the internal temperature of the food reaches the setpoint, the oven turns off and the buzzer sounds. To stop the buzzer, touch CLEAR/OFF.
If the probe is removed from the food before the setpoint is reached, the buzzer sounds and the display flashes until the probe is removed from the socket. You can use the timer even thought you cannot use timed oven functions while using the probe.
To avoid damaging the probe, be certain the food is defrosted before inserting the probe. It should not touch bone, fat, or gristle. When removing the probe, use a hot pad rather than tongs to avoid damage. Never leave the probe in the oven during a self-clean cycle.

The warming drawer uses a 500-watt, 110 VAC electric element.
Always start with hot food. Do not use the warming drawer to heat cold food. Allow approximate 25 minutes for the warming drawer to preheat. Do not put liquids, water, or aluminum foil in the warming drawer. The warming drawer cannot be used during a self-cleaning cycle.
To use the warming drawer:
1. Touch WARMING DRAWER.
2. Touch 1, 2, or 3 on the number pad to select low, medium, or high.
3. Touch START.
4. To turn it off, touch WARMING DRAWER. Touching CLEAR/OFF does nothing to the warming drawer.

Before using the self-cleaning cycle, especially for the first time, we recommend ventilating the kitchen with an open window or ventilation fan or hood. Remove the broiler pan and grid, all cookware, all shelving and racking, and any trace of aluminum foil.
Soils on the sealing surfaces of the door and the oven frame must be cleaned by hand. Use hot water, a soap-filled scouring pad, or a cleanser like SoftScrub®. Rinse well and dry thoroughly.
Do not attempt to clean the gasket. The fiberglass material cannot withstand abrasion. It is essential for the gasket to remain intact. If you detect fraying or wear, have the gasket replaced.
To set the oven for self cleaning:
1. Touch SELF CLEAN.
2. Use the number pads to set a clean time or go with the default of 420 (four hours and twenty minutes.)
3. Touch START.
4. When the cycle is complete, the LOCKED light will extinguish and the door will be unlocked.
If you set a self-clean cycle and forget to close the oven door, the display will flash LOCKED. To stop a self-clean cycle, touch CLEAR/OFF. The LOCKED light will extinguish and the door will unlock when the temperature has dropped to a safe level.
After a self-clean cycle, there may be some white ash in the oven. This may be wiped away with a damp cloth after the oven cools.
Questions? Comments! Concerns? Report an error?
Let us know!
An e-mail should solve the problem.